Quickstart: Embedded Login
Go from zero to fully passwordless authentication in just a few minutes with Passage by 1Password.
You can follow along with one of our example apps found on Github.
Embedded User Authentication with Passage
Here’s what is covered in this quick start guide:
- Create an app in the Passage Console
- Add Passage Element to your frontend
- Implement authorization middleware using backend SDK
- Done!
Create an app in the Passage Console
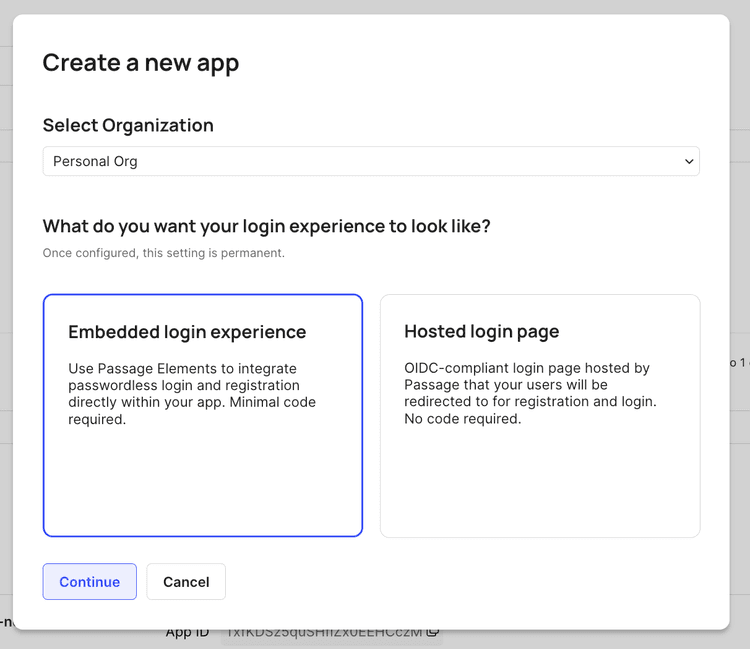
To create an app, first login or create an account for the Passage Console. When you first sign up, you will be redirected to your homepage that includes an example application to explore. To create your first new application, select the “Create New App” button on the home page and the “Embedded login experience” option.
Give your application a name and then provide the following fields:
- Authentication Origin - the domain that Passage will run on
- Redirect URL - the path you want to direct users to after successful login
For example, if you are building a local test app, your settings will probably look something like this:
- Authentication Origin -
http://localhost:8080 - Redirect URL -
/dashboardor/
Once you’ve created your application, copy the Application ID from the dashboard.
Add a Passage Element to your frontend
A Passage Element provides a complete UI/UX for users to register and login with biometrics or Magic Links.
In your web app, add the following code wherever you want your users to register or login. If you created a Passage account, you can include your Application ID that you copied in the last step:
<passage-auth app-id="PASTE PASSAGE APP ID HERE"></passage-auth>
<script src="https://cdn.passage.id/passage-elements/v2.x/passage-elements.js"></script>
You can now reload your webpage to see fully functional user authentication!
Implement authorization middleware
After your users sign in with a Passage Element, you can use a Passage backend library to authenticate their requests. The code snippets below demonstrate how to use Passage to authenticate requests:
Go
// example using Chi router
func (a *API) Handler() http.Handler {
	r := chi.NewRouter()

	r.Use(passageMiddleware)
	r.Route("/auth", exampleHandler)

	return r
}

// middleware that authenticates requests and sets
// passage user id in context
func (a *API) passageMiddleware(next http.Handler) http.Handler {
	return http.HandlerFunc(func(w http.ResponseWriter, r *http.Request) {
        // Get Passage JWT from the request's Authorization header
        authHeader := r.Header.Get("Authorization")
        token := strings.TrimPrefix(authHeader, "Bearer ")

		userID, err := psg.Auth.ValidateJwt(token)
		if err != nil {
			// unauthorized
		}

		ctx := context.WithValue(r.Context(), ctxPassageUserID, userID)
		next.ServeHTTP(w, r.WithContext(ctx))
	})
}

// example handler that uses passage middleware
func exampleHandler(w http.ResponseWriter, r *http.Request) {
	userID := r.Context().Value(ctxPassageUserID).(string)
}
Python
# example using Flask
@auth.before_request
def before_request():
    # Get Passage JWT from the request's Authorization header
    auth_header = req.headers["Authorization"]
    token = auth_header.removeprefix("Bearer").strip()

    # Validate jwt using Passage
    try:
        user_id: str = passage.auth.validate_jwt(token)
    except Exception:
        # unauthorized
        return render_template("unauthorized.html")

@auth.route("/authenticated", methods=["GET"])
def auth():
    # user_id will be set to the Passage user id here
    # ... add logic here ...
Node.js
// Passage middleware
const passageAuthMiddleware = (() => {
    return async (req, res, next) => {
        // Get Passage JWT from the request's Authorization header
        const authHeader = req.headers['Authorization'];
        // Drop the 'Bearer' prefix
        const token = authHeader.split(' ')[1];

        // Validate JWT using Passage
        try {
            const userId: string = await passage.auth.validateJwt(token);

            // user is authenticated
            res.userId = userId;
            next();
        } catch (err) {
            // unauthorized
        }
    };
})();

// authenticated route that uses middleware
app.get('/auth', passageAuthMiddleware, async (req, res) => {
    const userId = res.userId;
    // proceed
});
Ruby
To use Passage in your Ruby on Rails application, run gem install passageidentity at the command line.
# example using Rails
class ApplicationController < ActionController::Base
    before_action :authenticate_request

    def authenticate_request
        # Get Passage JWT from the request's Authorization header
        auth_header = request.env['HTTP_AUTHORIZATION']
        token = auth_header.delete_prefix('Bearer').strip

        # Validate JWT using Passage
        begin
            user_id = passage.auth.validate_jwt(jwt: token)
        rescue Exception => e
            # Authentication failed
        end
    end

    def authenticated_route
        # user_id will be set to the Passage user id here
        # ... add logic here ...
    end
end
PHP
// example using Laravel

// generate a new middleware
class AuthenticateRequest
{
    public function handle(Request $request, Closure $next)
    {
        // Get Passage JWT from the request's Authorization header
        $authHeader = $request->headers->get('Authorization');
        // Drop the 'Bearer' prefix
        $token = explode(' ', $authHeader)[1];

        try {
            $userId = $passage->auth->validateJwt($token);

            $request->attributes->set('passageUserId', $userId);
        } catch (\Exception $err) {
            // unauthorized
        }

        return $next($request);
    }
}

// apply middleware to routes
protected $routeMiddleware = [
    // Other route-specific middleware...
    'authenticated_route' => \App\Http\Middleware\AuthenticateRequest::class,
];
You just implemented awesome user authentication! 🎉
Visit your website in a browser to see how easy Passage is for your users.
What’s Next?
Once you have your application set up, you can:
- Explore the Passage Console dashboard to view users and add team members.
- Customize your Passage Element and your email templates to match your website’s brand.
- Learn how to implement custom success and failure behavior using JavaScript callbacks.
- Create an API key in the console and explore our management APIs and SDKs.
If you created a test app, users are ephemeral and are not persisted outside of your browser. To use Passage in production, claim your Passage app with the unique link in the Passage element or create a new app in the Passage Console.
Passage is always seeking feedback on the product. If you have feedback, bug reports, or feature requests, we would love to hear from you. Email us at support@passage.id or fill out this form.